What is Swagger for
The definition comes from the http://swagger.io/getting-started/ and is very informative:
“The goal of Swagger™ is to define a standard, language-agnostic interface to REST APIs which allows both humans and computers to discover and understand the capabilities of the service without access to source code, documentation, or through network traffic inspection. When properly defined via Swagger, a consumer can understand and interact with the remote service with a minimal amount of implementation logic. Similar to what interfaces have done for lower-level programming, Swagger removes the guesswork in calling the service”
Documentation and Testing
API needs Documentation
Imagine that you start a new project in which you have to implement a specific REST API for an application. We assume that the language you will use will be Java. You select the technology (spring, jersey etc), you setup your ide, and you start developing several services and api calls.
As soon as someone of your team wants to use your API (e.g. to build a user interface, test some methods), you will have to explain how all the methods and operations you have developed can be used. So you have to write down the exact signature of each method, the type of parameters and the type of possible response.
A simple solution is to have a wiki with all the information needed (methods, parameters etc) for the documentation part. But you have to update the wiki whenever some important changes happen.
API needs testing
There is also another need when you implement a REST API. You will probably have some junit tests to test your methods, but you will always need to test the real http methods yourself.
There are lot of tools with which you can do this, like Postman and DHC. But you have to write the tests and share it with your team
What about automation
The above problems can be solved using the swagger library. Documentation and test cases will be generated while you build your project. If you combine it with the CI environment you can auto deploy this documentation to a company server.
This way, your project will have always, the most updated documentation available for your team.
Below I will describe step by step, how you can achieve this:
Step One: Project Preparation
Assuming that the project uses maven, you have to add a plugin and the related dependency in pom.xml as descibed below:
<plugin>
<groupId>com.github.kongchen</groupId>
<artifactId>swagger-maven-plugin</artifactId>
<version>3.1.3</version>
<configuration>
<apiSources>
<apiSource>
 <springmvc>true</springmvc>
<locations>com.example.bookstore.BookStoreController</locations>
<schemes>http,https</schemes>
<host>api.host.com</host><basePath>/bookstore</basePath>
<info>
<title>Bookstore API Documentation</title>
<version>1.0</version>
</info> <templatePath>${basedir}/src/main/resources/templates/strapdown.html.hbs</templatePath>
<outputPath>${basedir}/generated/document.html</outputPath>
<swaggerDirectory>src/main/webapp/</swaggerDirectory>
</apiSource>
</apiSources>
</configuration>
<executions>
<execution>
<phase>compile</phase>
<goals>
<goal>generate</goal>
</goals>
</execution>
</executions>
</plugin>
<dependency>
<groupId>io.swagger</groupId>
<artifactId>swagger-core</artifactId>
<version>1.5.9</version>
</dependency>
The important parts from this plugin definition that you can configure/change for your needs are the following:
| Property | Value |
| host | The host name of the deployed service, e.g. api.host.com |
| springmvc | Tell the plugin if your project is a JAX-RS(false) or a SpringMvc(true) project |
| basePath | The base path of the api |
| schemes | http. https |
| locations | Comma seperated list of packages to include in the documentation |
| title | The html title of the produced api page |
| version | The version of the api |
| template path | The path of the termpate will be used for the html page will be created. You can find templates here: https://github.com/kongchen/api-doc-template |
| outputPath | Here you define the full local path of the html page that will be created |
| swaggerDirectory | if used, a json file will be created and can be used by swagger-ui to create an interactive html page with test capabilities (We will explain later what is swagger-ui) |
Now you are going to annotate the classes in order to produce the documentation. Below are the type of annotations will be used in our example:
- @Api
- @ApiOperation
- @ApiResponse
- @ApiParam
Step Two: Annotating our classes
Assume you have a java class acting as REST Controller, which provides some methods for a bookstore application.
After the REST framework related annotations you add the swagger annotation @Api
“The swaggen maven plugin will include this class in the exported documentation files, only if it has this annotation and if is included in the locations definition of the plugin in pom.xml”
Your class should be like this after adding the @Api class annotation
@RestController
@RequestMapping(value = "/bookstore")
@Api(value = "/bookstore")
public class BookStoreController {
….
….
….
}
Step Three: Annotate your methods
Here you will define the description of the api method, the type of response, and the possible response. We manage this by adding the following two annotations
- @ApiOperation(
- value=”description of the method goes here”,
- response=”Type of class the method returns e.g. ResponseEntity.class”
- @ApiResponse, possible return code and message we expect for our methods
Lets assume that you have a method for getting the details of a Book given its ISBN number. You can see below how this method have to be annotated.
@RequestMapping(value = "/get/{isbn}", method = RequestMethod.GET)
@Produces({"application/json"})
@ApiOperation(
value = "Get the book details for a given book isbn",
response = ResponseEntity.class)
@ApiResponses(value = {
@ApiResponse(code = 200, message = "Success", response = ResponseEntity.class),
@ApiResponse(code = 500, message = "Some error has occured", response = ResponseEntity.class)
})
public ResponseEntity<String> getBookDetailsbyIsbn( {
...
}
Step Four: Annotate your method parameters
Here you have to describle the parameters of the method. We use the @ApiParam annotation and we can define the following:
- name, name of the parameter
- value, detailed description of the parameter
- allowableValues (optional), here we can mention the values that only allowed to be passed to this variable in a comma
- seprated liat. For example if the accepted values are “123-4-56789-123-1” and “123-4-56789-123-2” you can defined it here.
required, set to true if mandatory
Below you can see an example of your method annotation
@RequestMapping(value = "/get/{isbn}", method = RequestMethod.GET)
@ApiOperation(
value = "Get the book details for a given book isbn",
response = ResponseEntity.class)
@ApiResponses(value = {
@ApiResponse(code = 200, message = "Success", response = ResponseEntity.class),
@ApiResponse(code = 500, message = "Some error has occured", response = ResponseEntity.class)
})

public ResponseEntity<String> getBookDetailsbyISBN(
@ApiParam(
name = "isbn",
value = "Get the details of a book, given the ISBN",
allowableValues = "123-4-56789-123-1,123-4-56789-123-2",
required = true)
@PathVariable String isbn) {
…
…
}
You are almost ready. You have done till now the following:
- Annotated your class
- Annotated your method
- Annotated your parameters
Step Five: Generate the documentation
You have already defined in pom.xml the phase of maven that the generation of the swagger artifacts will take place.
<executions>
<execution>
<phase>compile</phase>
<goals>
<goal>generate</goal>
</goals>
</execution>
</executions>
With this configuration the generation will take place after each compilation of our project. We can change it to happen in deploy or install phase according to our needs.
We already have defined in the plugin definition the directories in which the generated files will go:
<outputPath>${basedir}/generated/document.html</outputPath>
<swaggerDirectory>src/main/webapp/</swaggerDirectory>
We build the project using the command “mvn package” and we can see in our project folder the folder with name “generated” in which the produced file exist in.

Step Six: Deploy the documentation
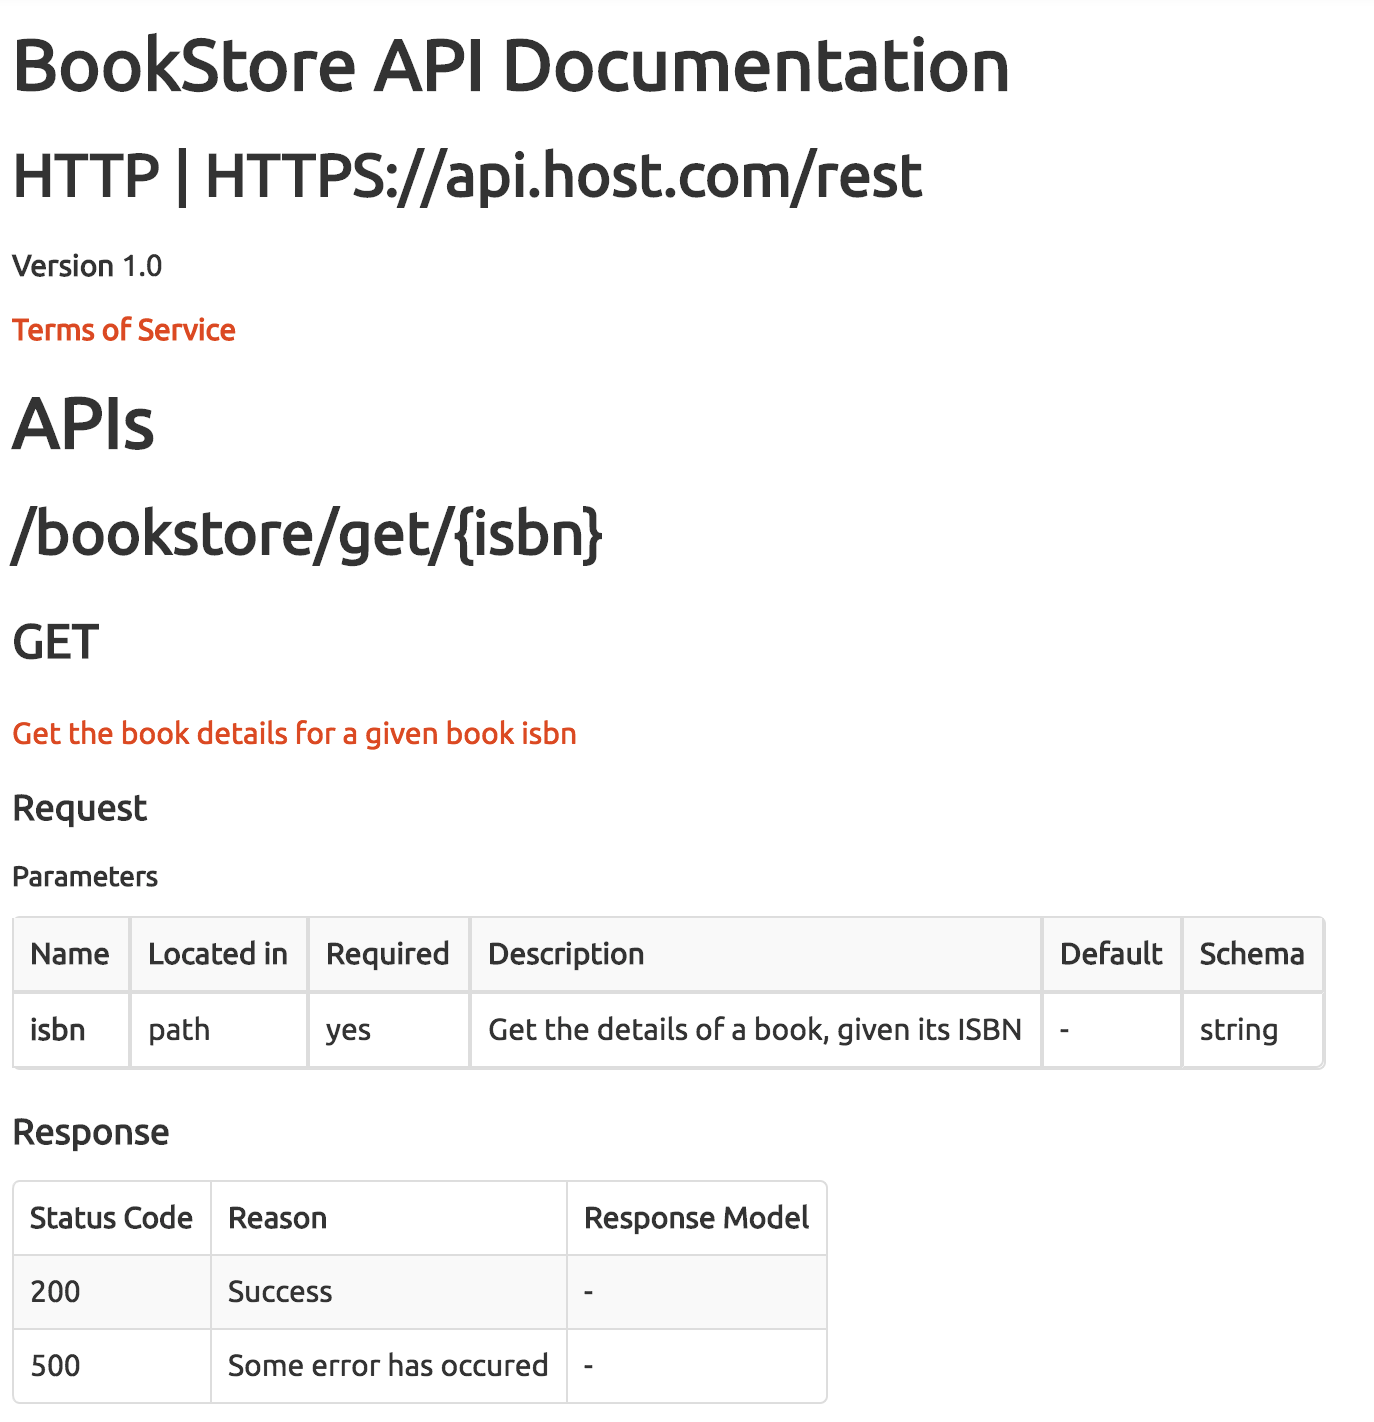
Here we have two options. We can simply copy the document.html file to one of our company webservers and give this url to the project team. This task can easily automated with a CI tool like Jenkins. Below is an example of the produced documentation.
The other option is to use the json file that has been generated and display it using another application provided by swagger. You can download the swagger-ui application and deploy it in a webserver. This will be accessible like this http://<servername>/swagger-ui
Then you can deploy your json file to a webserver (i.e. next to html file) and then you can render this json file using swagger-ui application using this url pattern:
http://<servername>/swagger-ui/dist/index.html?url=<path of your json file>
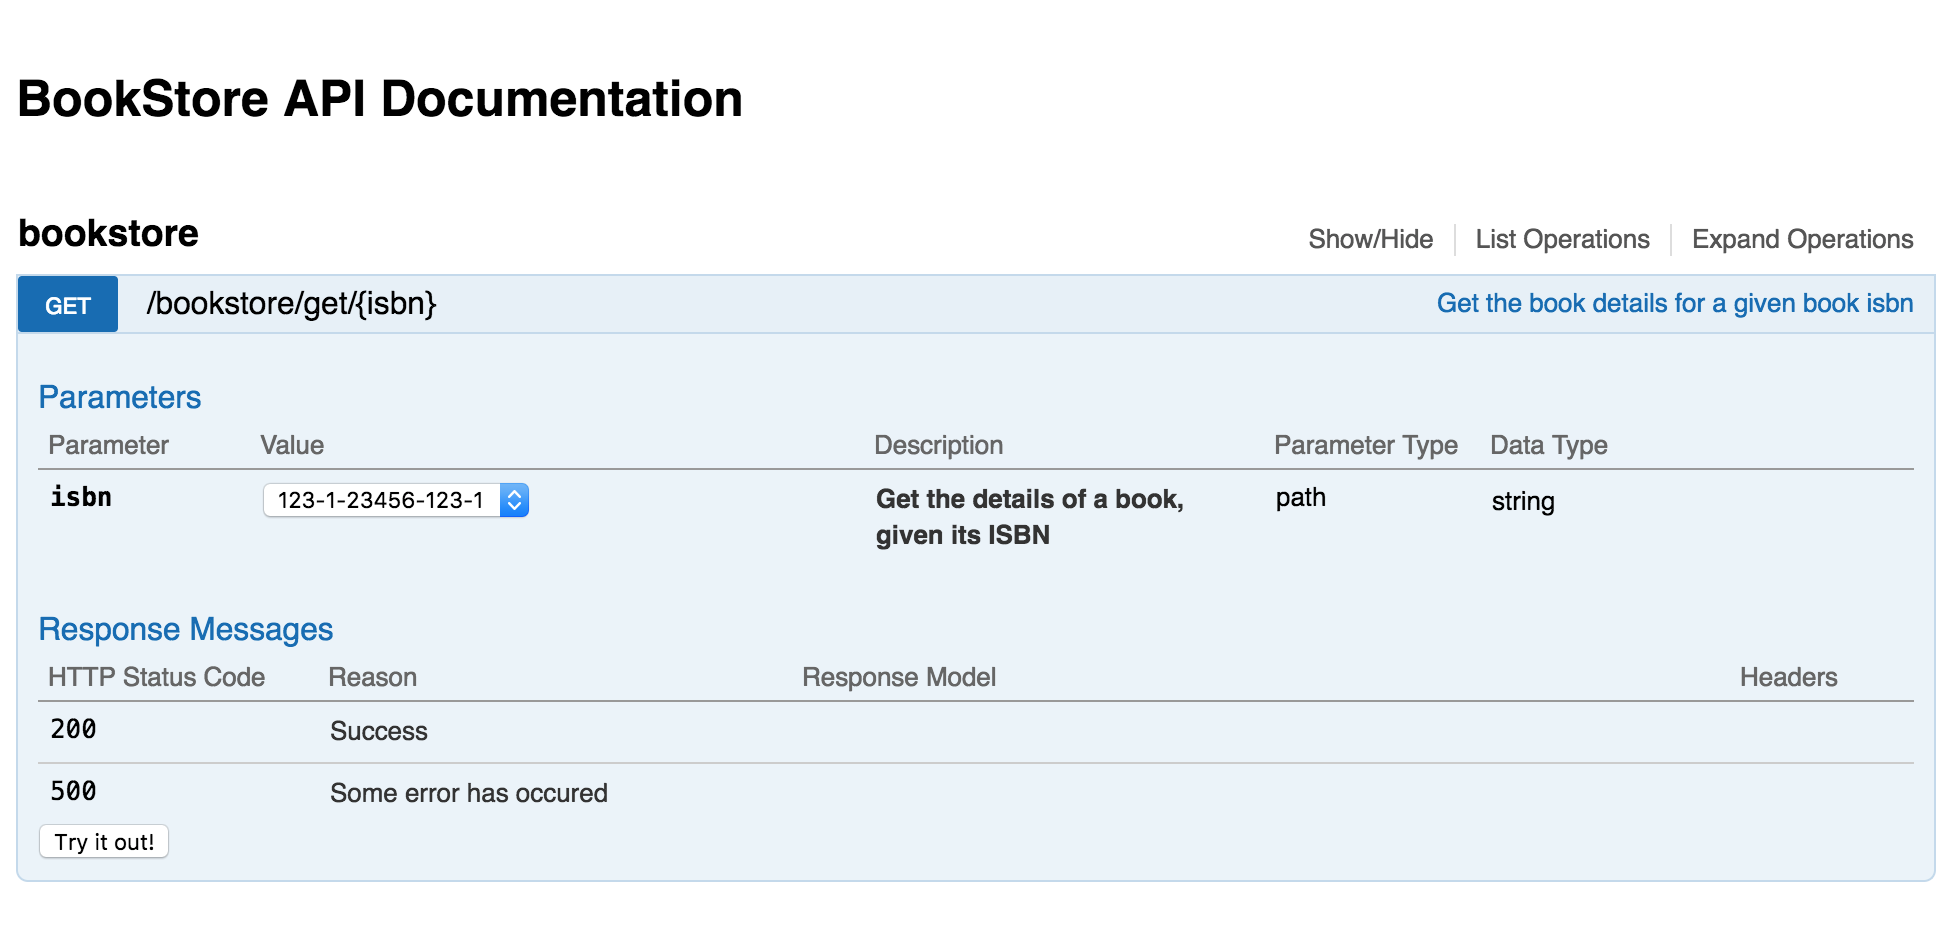
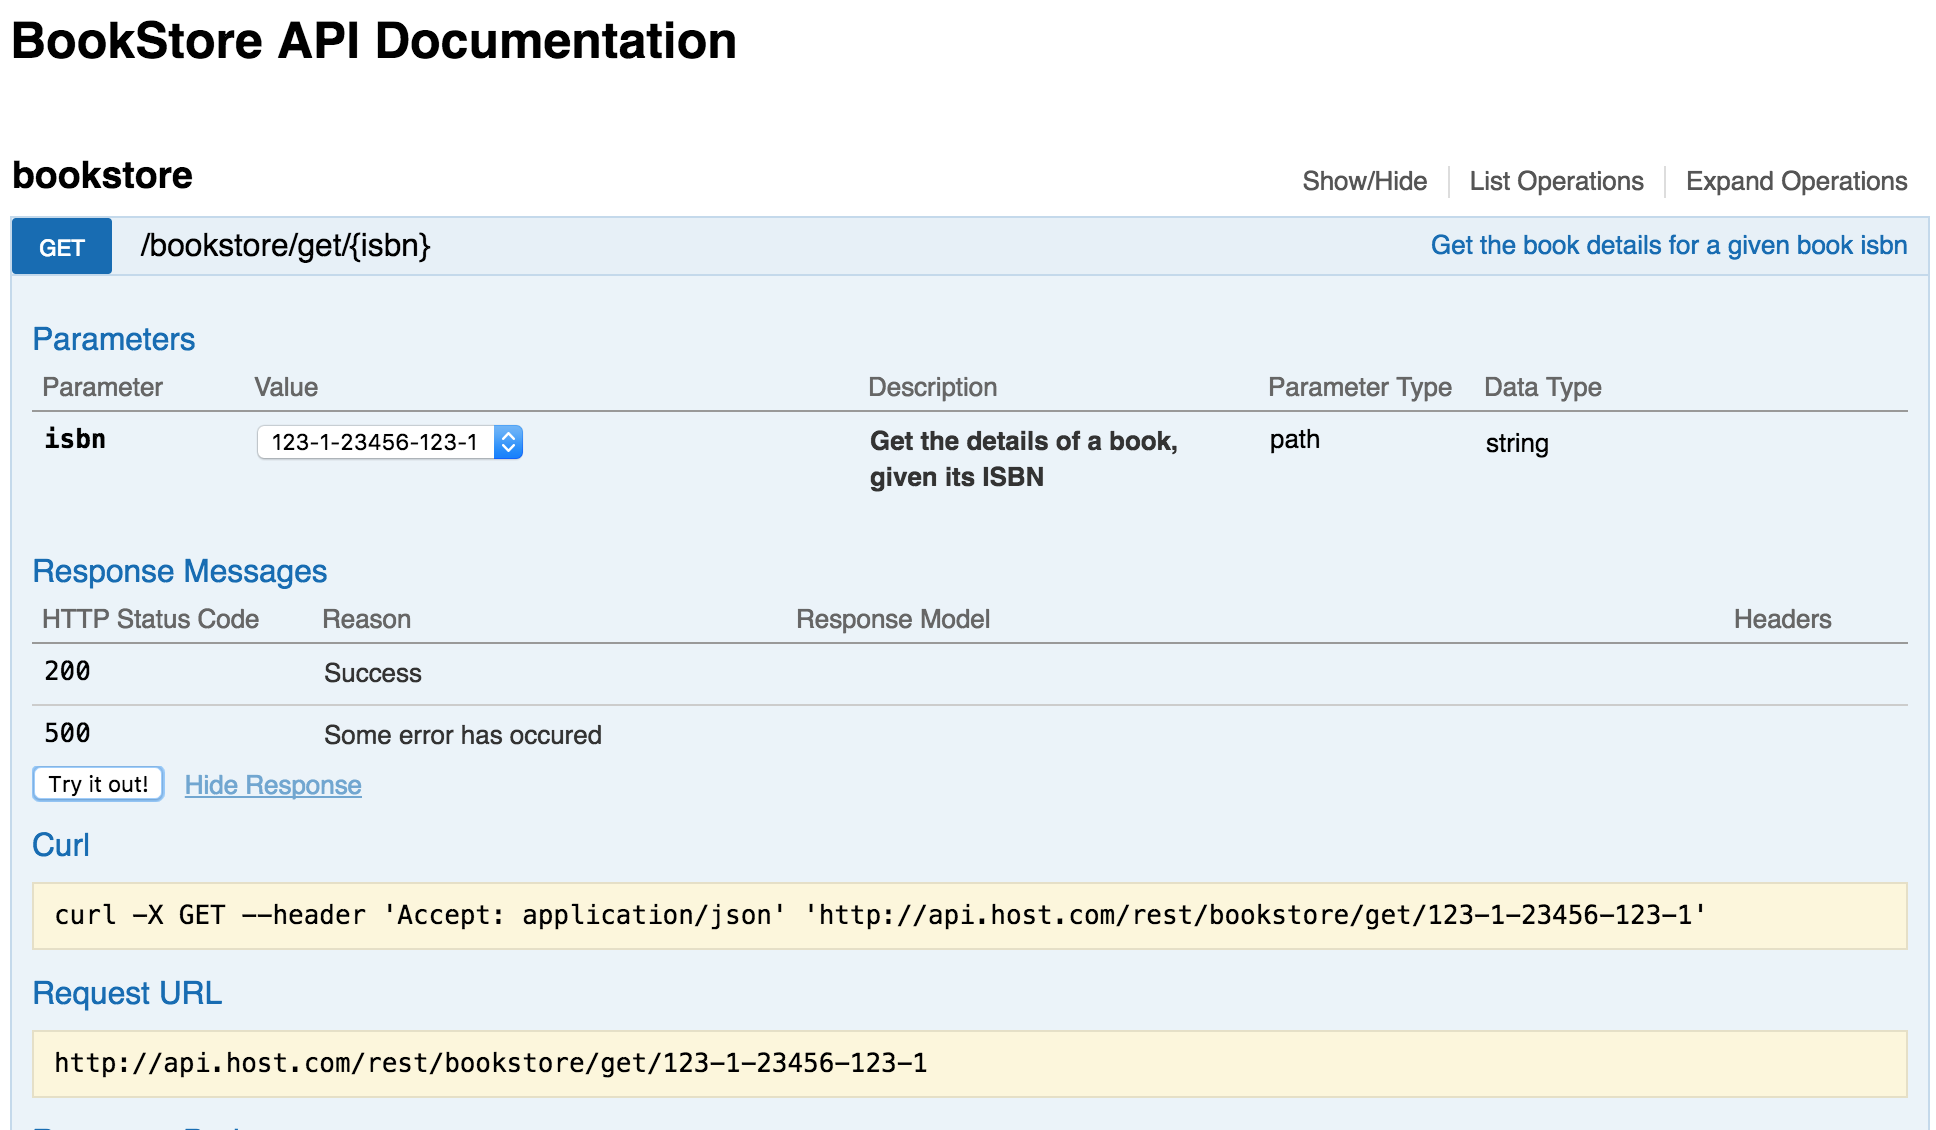
This is a generic application with which you can display the documentation of your methods and also you can make some test requests against the medods of your api, by selecting the try it out button
Conclusion
We have seen in six simple steps how to produce simple and useful documentation for your api. And from now on your team will not have to guess when calling the services
How can I add security information(authorization roles) in swagger ui
I usually add an annotation like this:
@ApiImplicitParams({
@ApiImplicitParam(name = “Authorization”, value = “User’s token”, required = true, dataType = “string”, paramType = “header”),})
just after @ApiOperation and before @ApiResponses operation
PS. You can take a look to the updated post. It is completed updated!